
C.O.R.N. Newsletter: 2021-06
-
Typical March Weather Continues

Figure 1). Multi-sensor precipitation estimates for the past 30-days ending March 14, 2021. Courtesy of the Midwest Regional Climate Center.
After a warm December and January but chilly February, Ohio’s winter will go down as one of near-average temperatures for the season. This past winter also ranks as the 23rd driest on record (1895-2021). This was a bit unusual given the cooler than average sea surface temperatures in the tropical Pacific Ocean, a pattern referred to as La Niña, and one that often brings wet weather to the Ohio Valley during winter and early spring.
A more active pattern has certainly set in over the last several weeks, especially across southern Ohio. Precipitation for the last 30 days shows quite a contrast between northern and southern Ohio, with less than 1 inch falling across northwestern counties, while areas near the Ohio River have experienced more than 4 inches (Fig. 1). With long-term lingering dry conditions relative to average across northern Ohio, the current U.S. Drought Monitor depicts more than 50% of the state in abnormally dry conditions, with Fulton, Lucas, and northern Wood counties currently in moderate drought conditions. Whether this long-term dryness will have an impact on the summer growing season could largely be determined by the weather pattern over the next several weeks.
 Forecast
Figure 2: Forecast precipitation for the next 7 days. Valid from 7 pm Monday March 15, 2021 through 7 pm Monday March 23, 2021. Figure from the Weather Prediction Center.
A system that brought rain (freezing rain and sleet to some areas) across the state on Monday will be moving out of the region on Tuesday. After a brief break on Wednesday, a potent system will move through on Thursday with another round of showers and thunderstorms. Under the influence of high pressure, conditions will dry out over the weekend with fair weather expected. Highs in the 50s and 60s midweek will trend cooler for Thursday and Friday, then slightly warmer temperatures will resume for the weekend. The Weather Prediction Center is currently forecasting 0.75-1.50” of rain across Ohio over the next 7 days (Fig. 2).
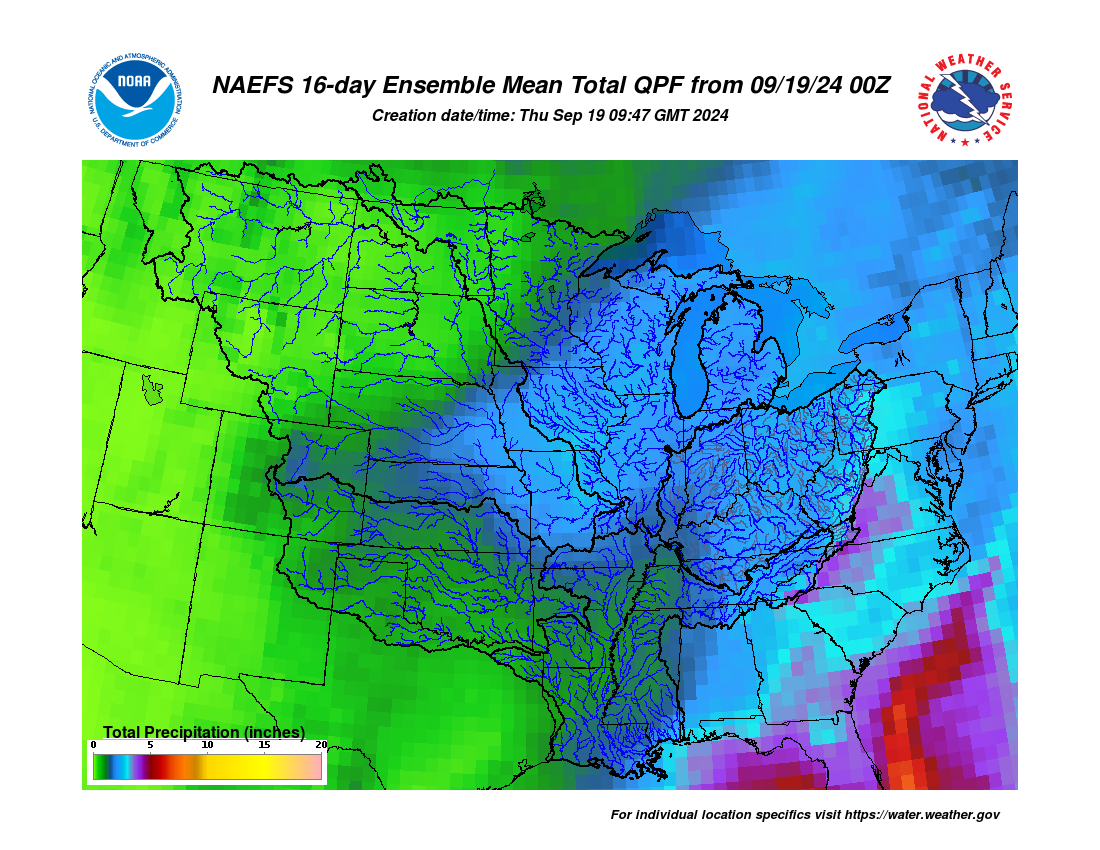
The latest NOAA/NWS/Climate Prediction Center outlook for the 8-14 day period (March 23 -29) and the 16-Day Rainfall Outlook from NOAA/NWS/Ohio River Forecast Center show a strong probability of above average temperatures and elevated probability of above average precipitation (Fig. 3). Normal highs (north-to-south) during the period are in the upper-40s to mid-50s, lows in the upper-20s to mid-30s, with 0.5-1.00” of precipitation per week.
Figure 3: Climate Prediction Center 8-14 Day Outlook valid for March 23 - 29, 2020 for left) temperatures and right) precipitation. Colors represent the probability of below, normal, or above normal conditions.

-
Wheat Growth Stages and Associated Management- Feekes 6.0 through 9.0

It is important to correctly identify winter wheat growth stages to enhance management decisions, avoiding damage to the crop and unwarranted or ineffective applications. Remember, exact growth stage cannot be determined by just looking at the height of the crop or based on calendar dates. Remember to stage several plants from several areas within your field.
Here, we will focus on staging wheat Feekes 6.0 through 9.0.
Feekes 6.0: At Feekes 6.0 growth stage, nodes are all formed, but sandwiched together so that they are not readily distinguishable. The first node is swollen and appears above the soil surface. This stage is commonly referred to as “jointing”. Above the node is the head or spike, which is being pushed upwards eventually from the boot. The spike at this stage is fully differentiated, containing future spikelets and florets.
Growers should remove and carefully examine plants for the first node. It can usually be seen and felt by removing the lower leaves and leaf sheaths from the large wheat stems. A sharp knife or razor blade is useful to split stems to determine the location of the developing head. A video showing how to identify the Feekes 6.0 growth stage can be found here: https://www.youtube.com/watch?v=iukwznx4DPk

Feekes 7.0: At Feekes 7.0 growth stage, the second node becomes visible. This stage is characterized by the rapid expansion of the head and a second detectable node. Look for the presence of two nodes- one should be between 1.5 and 3 inches from the base of them stem and the other should be about 4 to 6 inches above the base of the stem. These nodes are usually seen as clearly swollen areas of a distinctively different (darker) shade of green than the rest of the stem. The upper node may be hidden by the leaf sheath; you may have to run your fingers up the stem to feel for it. If only one node is present, the wheat is still at Feekes 6.0 growth stage. Wheat will still respond to nitrogen applied at Feekes 7.0 if weather prevented an earlier application; however, mechanical damage may occur from applicator equipment. A video showing how to identify the Feekes 7.0 and 8.0 growth stages can be found here: https://www.youtube.com/watch?v=PZ7Lvsux1y8
Feekes 8.0: At Feekes 8.0 growth stage, the flag leaf is visible, but still rolled up. This growth stage begins when the last leaf (flag leaf) begins to emerge from the whorl. This stage is particularly significant because the flag leaf makes up approximately 75% of the effective leaf area that contributes to grain fill. It is therefore important to protect and maintain the health of this leaf (free of disease and insect damage) before and during grain development. When the flag leaf emerges, three nodes are visible above the soil surface. To confirm that the leaf emerging is the flag leaf, split the leaf sheath above the highest node. If the head and no additional leaves are found inside, Feekes 8.0 is confirmed and the grower should decide whether or not to use foliar fungicides to manage early-season and overwintering fungal diseases. Nitrogen fertilizer applications at or after Feekes 8.0 growth stage may enhance grain protein levels, but are questionable with respect to added yield. Moreover, additional N may increase the severity of some foliar diseases, particularly the rusts.

Feekes 9.0: Feekes 9.0 growth stage begins when the flag leaf is fully emerged from the whorl with the ligule and collar visible. From this point on, leaves are referred to in relation to the flag leaf (e.g., the first leaf below the flag leaf is the F-1, the second leaf below is F-2, and so forth). A video showing how to identify Feekes 9.0 and 10.0 growth stages can be found here: https://www.youtube.com/watch?v=OHGhq0qSM1o&t=22s

For more information on Wheat Growth Stages and Associated Management, see our FactSheet: https://ohioline.osu.edu/factsheet/agf-12
-
Topdressing Wheat with Liquid Swine Manure

Wheat fields are firming up across Ohio and topdressing with nitrogen fertilizer has started. We have had less precipitation than usual, and more livestock producers may be considering applying liquid swine manure as a topdress for wheat.
The key to applying the correct amount of manure to fertilize wheat is to know the manure’s nitrogen content. Most manure tests reveal total nitrogen, ammonia nitrogen and organic nitrogen amounts. The ammonia nitrogen portion is readily available for plant growth. The organic nitrogen portion takes considerably longer to mineralize and generally will not be available when wheat uptakes the majority of its nitrogen before mid-June.
Most deep-pit swine finishing manure will contain between 30 and 40 pounds of ammonia nitrogen per 1,000 gallons. Finishing buildings with bowl waters and other water conservation systems can result in nitrogen amounts towards the upper end of this range. Finishing buildings with fixed nipple waters and surface water occasionally entering the pit can result in nitrogen amounts towards the lower end of this range.
In past years, some farmers have used sow manure to topdress wheat. Just know the nitrogen amount in sow manure will be much lower than swine finishing manure.
In university research, we have used both manure tankers and drag hoses when topdressing wheat. The concern with manure tankers is soil compaction, especially on heavy soils. The drag hose seemed to work well wherever it was used.
The typical application rate for liquid swine finishing manure on wheat is 4,000 gallons per acre. Wheat removes 0.49 pounds of P2O5 per bushel harvested. When also harvesting the wheat straw, a ton of wheat straw contains between three and four pounds of P2O5. So, a 100 bushel wheat crop with one ton of straw also removed would withdraw about 52 pounds of P2O5 per acre. This is likely about the same amount of P2O5 as 4,000 gallons of swine finishing manure would contain but review your manure test to make this determination.
When applying livestock manure to wheat it’s recommended to follow the NRCS #590 Waste Utilization Standard to minimize potential environmental impacts. This standard includes a 35 foot wide vegetative strip setback from ditches and streams. Applicators in the Western Lake Erie Basin also need to look at the weather forecast to be certain there is not greater than a 50 percent chance of a half-inch of rain in the 24 hours following manure application when surface applying. Print this forecast so you have proof in the event of a surprise rain downpour.
-
Time is now to purchase the right nozzles for your spraying needs

This is the time of the year you must complete shopping for nozzles because the spraying season is just around the corner. Each part of the application equipment plays a critical role in achieving maximum performance from the sprayer. Therefore, each component must be selected carefully and must perform successfully the tasks associated with it. Although nozzles are some of the least expensive components of a sprayer, they hold a high value in their ability to influence sprayer performance. They help determine the gallon per acre intended application rate. They also influence the droplet size, which plays a significant role in achieving improved penetration into crop canopy and better coverage on the target pest, both affect the efficacy we expect from pesticides applied. Wrong choice of nozzle may hurt us in several ways, but here are the three most obvious ones: We may end up with streaks of untreated areas causing non-uniform pest control; or simply complete failure or ineffective pest control which require repeat applications; and finally, we may end up losing a significant part of the pesticides applied in the form of spray drift. Sometimes, the choice of nozzle may be determined by the requirements given on the pesticide label.
Selecting the best nozzle requires careful consideration of many important factors including: sprayer operation parameters (such as application rate, spray pressure, travel speed); type of chemical sprayed (herbicides, insecticides, fungicides); mode of action of chemicals (systemic, contact); application type (broadcast, band, directed, air assisted); target crop (field crops, vegetables, vineyard, shrubs and trees, etc.); and spray drift risk. I will briefly cover some of these topics in this article. For detailed information on nozzle selection, I strongly recommend you read a new Ohio State University Extension Publication, entitled “Selecting the Best Nozzle for the Job”. In this publication, you will see step-by-step guidelines for selecting the most appropriate spray nozzle for a given application situation. The publication is available online at following web site: http://ohioline.osu.edu/factsheet/fabe-528
Which nozzle type is best for your situation?

When I get a question like, “what is the best nozzle I can buy?”, my answer is: it depends on the job on hand. The nozzle selection is a two-step process. First, we need to determine the type of nozzle best for a given situation. Next, we need to determine the appropriate size of that nozzle that will be capable of providing the desired gallons per acre application rate under various operating conditions such as travel speed and spray pressure. Each nozzle type is designed for a specific type of target and application. For example, a nozzle designed for broadcast spraying is not good for spraying pesticides over a narrow band. While one nozzle may be best for a given situation, it may be worst choice for another. For example, we at Ohio State University have conducted field experiments to determine which nozzles to choose for two different application situations: soybean diseases such as rust and white mold, and wheat diseases such as head scab and stem rust. We included 6-8 different nozzles in the experiments. We found out that while a twin-fan pattern nozzle was best for controlling wheat head scab, the same nozzle turned out to be the worst choice to protect soybeans against rust and white mold when the soybean canopy is tall and dense. So, before buying the nozzles and putting them on the boom, check the nozzle manufacturers’ catalogs which have charts showing which nozzle type will be best for a specific job. Check the websites of nozzle manufacturers to reach their catalogs.
Nozzle size
Once you determine the type of a nozzle you need to buy, you also must buy the right size of that nozzle which will satisfy the application rate (gallons per acre or gpa) you wish to use as you do your spraying at different travel speeds. Nozzle catalogs are filled with tables and charts showing application rates, given a nozzle’s flow rate (gallons per minute or gpm) delivered at various pressures (psi) and travel speeds (mph). However, the charts are only for a limited number of travel speed and nozzle spacing situations. Most nozzle manufacturers have developed Apps for smart phones that provide you the exact nozzle flow rate required for any given set of application parameters, and identify a specific set of nozzle recommendations for the given application parameters. To find these Apps, simply visit the App Store in your smart phone or tablet and do a search under “Spray Nozzle Calculator”, or some other key words related to nozzle size selection.
Keep several types of nozzles on the boom
Remember that one specific type of nozzle will not be best for all applications. For this reason, it is best to have several types and sizes of nozzles on the boom so that you can switch to the “best” nozzle choice for a given spraying job. As shown in the pictures below, there are various types of sprayer components and setups you can buy to configure your boom so the new set up allows you to easily switch from one nozzle to another instantly.


Keep spray drift in mind when selecting nozzles
Spray drift (movement of pesticides by wind from the application site to an off- target site) is a serious problem for many reasons. Extensive information related to factors influencing creation of spray drift, is provided in the Ohio State University Extension publication FABE-525 (http://ohioline.osu.edu/factsheet/fabe-525). After wind speed and other weather-related conditions, choice of nozzles is the second most influential factor affecting drift. Research conducted at The Ohio State University and elsewhere clearly indicate that nozzles labeled as “low-drift” significantly reduce spray drift. If drift is, or becomes a concern, it may be best to switch from a conventional nozzle to a “low-drift” version of the same type nozzle with the same flow rate. This is another good reason to have more than one type of a nozzle on the boom.
Give special attention to choice of nozzles when applying pesticides containing 2,4-D and Dicamba
The labels of 2,4-D or Dicamba herbicides include specific requirements on which nozzle or nozzles must be used when spraying these products. The requirements also include a range of operating pressures for each one of these nozzles. These strict requirements are put on the labels to avoid off-target movement (drift) of spray droplets. Simple interpretation of these requirements is: you would be violating the pesticide label, therefore the law, if you use any other type and size of nozzle and operate these nozzles outside the pressure ranges. Remember, the label is the law! So, it is your responsibility to comply with the requirements on pesticide labels. You can reach a list of currently approved nozzles and their operating pressure ranges on labels of the several commonly used 2,4-D and Dicamba products at this web site: https://pested.osu.edu/sites/pested/files/imce/ApprovedNozzles.pdf
The table at this site is provided mostly for information purposes and may not be up to date. So, check the manufacturers’ websites, and read the product label for the most current information. Do not assume that you do not have to worry about checking the label because you had applied the same product in a previous year. A nozzle required for the same product last year may not be on the label this year, or the operating pressures might have been changed.
Some final thoughts
Nozzles are typically the least costly items on a sprayer, but they play a key role in the final outcome from a spraying job: achieving maximum efficacy from the pesticide applied while reducing the off-target (drift) movement of pesticides to minimum. Pesticides work well if the rates on labels are achieved during application. This can be achieved only if the right nozzle type and the proper size of the nozzles are on the sprayer, and the sprayer is operated properly.
-
Forage Planting – How to Do It Well
Early spring provides one of the two preferred times to seed perennial cool-season forages, the other being late summer. The outlook for this spring is for probabilities of above average precipitation in April and May. Planting opportunities will likely be few and short. An accompanying article on preparing now for planting along with the following 10 steps to follow on the day you plant will help improve chances for successful forage establishment.
- Check now to make sure soil pH and fertility are in the recommended ranges. Follow the Tri-state Soil Fertility Recommendations (https://forages.osu.edu/forage-management/soil-fertility-forages) . Forages are more productive where soil pH is above 6.0, but for alfalfa it should be 6.5 – 6.8. Soil phosphorus should be at least 20 ppm for grasses and 30 ppm for legumes, while minimum soil potassium should be 100 ppm for sandy soils less than 5 CEC or 120 ppm on all other soils. If seedings are to include alfalfa, and soil pH is not at least 6.5, it would be best to apply lime now and delay establishing alfalfa until late summer (plant an annual grass forage in the interim).
- Plant high quality seed of known varietal source adapted to our region. Planting “common” seed (variety not stated) usually proves to be a very poor investment, yielding less even in the first or second year and having shorter stand life. Be mindful of how much seed coating is present on the seed you are planting. Many of the new alfalfa varieties are sold with a 34% clay coating by weight, so your actual pure live seed rate would be dramatically reduced if you don’t adjust for the seed coating.
- Calibrate forage seeders ahead of time. Seed flow can vary greatly for different varieties and depending on the seed treatment and coatings applied. A good video on this entitled “Drill Calibration” is at https://forages.osu.edu/video/.
- Prepare a good seedbed as soon as soils are fit in April. The ideal seedbed for conventional seedings is smooth, firm, and weed-free. Don’t overwork the soil. Too much tillage depletes moisture and increases the risk of surface crusting. Firm the seedbed before seeding to ensure good seed-soil contact and reduce the rate of drying in the seed zone. Cultipackers and cultimulchers are excellent implements for firming the soil. If residue cover is more than 35% use a no-till drill. No-till seeding is an excellent choice where soil erosion is a hazard. No-till forage seedings are most successful on silt loam soils with good drainage and are more difficult on clay soils or poorly drained soils. You will want no-till fields to be smooth because you do not want to bounce over them for all the years of this stand!
- Try to finish seeding by the end of April in southern Ohio and by the first of May in northern Ohio. Timely planting gives forage seedlings the jump on weeds and the forages become established before summer stress sets in. Weed pressure increases with later plantings, and forages will not have as strong a root system developed by early summer when conditions can turn dry and hot. Later plantings also yield less, so if planting is delayed, it might be better to plant a summer annual and establish the perennial forages in August.
- Plant seed shallow (¼ to ½ inch deep) in good contact with the soil. Stop and check the actual depth of the seed in the field when you first start planting. This is especially important with no-till drills. In my experience, seeding some seed on the surface indicates most of the seed is about at the right depth.
- When seeding into a tilled seedbed, drills with press wheels are the best choice. When seeding without press wheels or when broadcasting seed, cultipack before and after dropping the seed, preferably in the same direction the seeder was driven.
- In fields with little erosion hazard, direct seedings without a companion crop in the spring allows harvesting two or three crops of high-quality forage in the seeding year, particularly when seeding alfalfa and red clover. For conventional seedings on erosion prone fields, a small grain companion crop can reduce the erosion hazard and will also help compete with weeds. Companion crops like oat can also help on soils prone to surface crusting. Companion crops usually increase total forage tonnage in the seeding year, but forage quality will be lower than direct seeded legumes. Take the following precautions to avoid excessive competition of the companion crop with forage seedlings: (i) use early-maturing, short, and stiff-strawed small grain varieties, (ii) plant small grains at 1.5-2.0 bu/A, (iii) remove companion crop as early pasture or silage, and (iv) do not apply additional nitrogen to the companion crop.
- During the first 6 to 8 weeks after seeding, scout new seedings weekly for any developing weed or insect problems. Weed competition during the first six weeks is most damaging to stand establishment. Potato leafhopper damage on legumes in particular can be a concern beginning in late May to early June.
- The first harvest of the new seeding should generally be delayed until early flowering of legumes (approximately 60 days after emergence) unless weeds were not controlled adequately and are threatening to smother the stand. For pure grass seedings, generally harvest after 70 days from planting, unless weeds are encroaching in which case the stand should be clipped earlier to avoid weed seed production.
-
Transition to Organic Grain Workshop Offered on March 30
As many producers look to diversify their farms and find opportunities to increase on-farm revenues – one potential avenue to consider is organic grain production. A Transition to Organic Grains workshop offered through Ohio State University Extension in Putnam County will take place in Ottawa, OH at the Putnam County Educational Services Center on March 30, 2021 from 9 am to 2 pm. The workshop is designed to answer producers’ common questions when considering a move from conventional to organic production. What do I need to know and what steps do I need to take to transition my fields to organic production? How long will the process take? What markets are available for my grain? How do I approach fertilization, weed management, and pest control? These and many more questions will be answered by industry and extension experts – as well as first-hand experiences of organic farmers.
The Transition to Organic Grains workshop is offered at no cost, but registration is required. Registration includes all handouts and a boxed lunch. To register, please call the Putnam County Extension office at 419-523-6294, visit http://putnam.osu.edu, or email Scheckelhoff.11@osu.edu.
Crop Observation and Recommendation Network
C.O.R.N. Newsletter is a summary of crop observations, related information, and appropriate recommendations for Ohio crop producers and industry. C.O.R.N. Newsletter is produced by the Ohio State University Extension Agronomy Team, state specialists at The Ohio State University and the Ohio Agricultural Research and Development Center (OARDC). C.O.R.N. Newsletter questions are directed to Extension and OARDC state specialists and associates at Ohio State.
Contributors
Disclaimer
The information presented here, along with any trade names used, is supplied with the understanding that no discrimination is intended and no endorsement is made by Ohio State University Extension is implied. Although every attempt is made to produce information that is complete, timely, and accurate, the pesticide user bears responsibility of consulting the pesticide label and adhering to those directions.
CFAES provides research and related educational programs to clientele on a nondiscriminatory basis. For more information, visit cfaesdiversity.osu.edu. For an accessible format of this publication, visit cfaes.osu.edu/accessibility.